Double VPN with pfSense
This article is a 2020 simplification of part 6 of the Mirimir Advanced Privacy and Anonymity series, which was originally written in 2013.
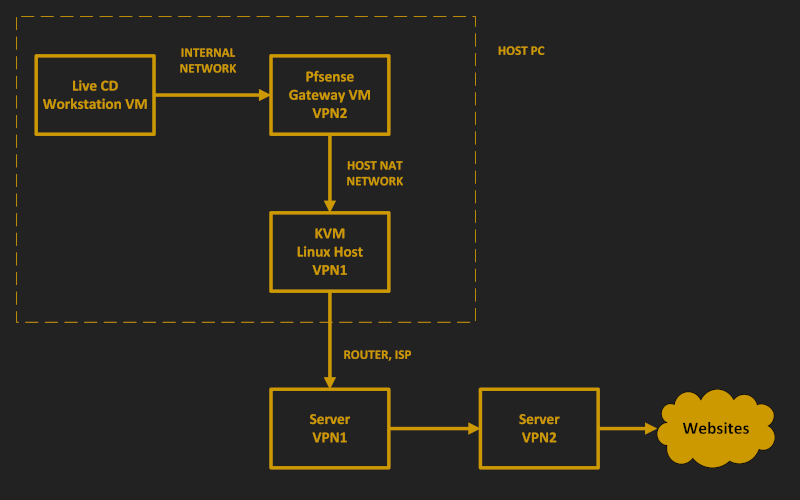
In this configuration:
- Your host computer connects to VPN1
- A gateway VM connects to VPN2, which is tunneled through VPN1
- You do all your work on a workstation VM
The workstation VM has no direct connection to the Internet. All its traffic is forced to go, via an internal network, through the gateway VM.
With two different VPNs, no single party sees both your IP address and your destination site. VPN1 sees only your origin IP address. VPN2 sees only your destination site. Assuming your destination sites uses HTTPS, none of the intermediate parties sees your actual content.
The host computer in this tutorial runs Debian. Virtualization is provided by Kernel-based Virtual Machine (KVM). The gateway runs pfSense, and the workstation runs a live CD edition of Debian.
1. Initial Set Up
1.1. Select DNS Provider
The Mirimir tutorial placed great emphasis on the privacy of your DNS requests. The 2013 article recommended you choose from the third-party DNS servers listed by WikiLeaks or JonDonym. Another source is public-dns.info, which maintains a huge list of public DNS servers that is checked continuously, and which allows you to select DNS servers by country. You could alternatively choose any other DNS provider of your choice, e.g. Google, Cloudflare, Quad9, etc.
In the examples in this article:
- The host computer uses DNS servers
1.1.1.1and1.0.0.1for IPv4, and2606:4700:4700::1111and2606:4700:4700::1001for IPv46 - The gateway VM uses DNS servers
9.9.9.9and149.112.112.112 - The workstation will be pushed
208.67.222.222and208.67.220.220
1.2a. Configure Host DNS Servers
This section gives the general method for changing DNS servers on Debian with GNOME desktop. The section below describes an alternative method if you choose Cloudflare for your DNS servers.
Open GNOME settings, and go to the Network page if you use a wired connection or the Wi-Fi page if you use wireless.
- Set the IPv4 DNS servers to your choices. In our example, those are
1.1.1.1and1.0.0.1. - If your networking has IPv6 enabled, also set the IPv6 DNS servers to your choices. In our example, those are
2606:4700:4700::1111and2606:4700:4700::1001.
In theory you should just have to restart NetworkManager here, but in practice you may need to reboot.
1.2b. Alternative Method for Cloudflare DNS Servers
You can improve your DNS security by installing dnscrypt-proxy. This prevents DNS sniffing and ISP proxying.
sudo apt install dnscrypt-proxy
Allow dnscrypt-proxy to bind to a privileged port by editing the systemd service file:
vi /usr/lib/systemd/system/dnscrypt-proxy.service
Remove the line:
User=_dnscrypt-proxy
Save the file. Reload systemd:
sudo systemctl daemon-reload
Edit the configuration:
sudo vi /etc/dnscrypt-proxy/dnscrypt-proxy.toml
Make it listen on IPv4 (and IPv6 if you use IPv6):
listen_addresses = ['127.0.0.1:53', '[::1]:53']

                server_names = ['cloudflare', 'cloudflare-ipv6']
Start the service:
sudo systemctl enable dnscrypt-proxy.service
sudo systemctl start dnscrypt-proxy.service
As in the section above, change your GNOME settings for your main interface’s nameservers, but this time specify them as 127.0.0.1 for IPv4 (and
::1 for IPv6).
In theory you should just have to restart NetworkManager after changing your nameservers, but in practice you may need to:
reboot
1.3. Create VPN Accounts
You need two VPN providers. Some privacy-focused providers you might consider are IVPN, Mullvad, and AirVPN. SecurityKISS, mentioned in the original article, discontinued its VPN service in May 2020.
As you search for suitable VPN providers, beware of affililate pages posing as reviews. Also be skeptical of claims not to keep logs. In the past, at least one provider turned out to be dishonest in this respect. And watch out for free VPNs based in mainland China which are under the control of the Chinese Communist Party.
When you have your account opened for VPN1, download the configuration file to your host PC. We’ll call it vpn1.ovpn. We’ll import it to the host in a
few minutes.
The components of the VPN2 configuration need to be split out for pfSense rather than combined in single file. We will do that when we come to the sections for pfSense, so there is nothing to do for now.
1.4. Configure VPN1
At this stage, you have all the information you need to configure the VPN1 client on your host PC.
The procedure for installing the VPN client will vary, depending on which client software and which VPN provider you chose. Some providers recommend you use the generic OpenVPN client, while others have their own client.
- If you are using the generic OpenVPN client, then install it now (
sudo apt install network-manager-openvpn-gnome). Once it’s installed, open GNOME settings, go to the Network page, add a new VPN, select Import from file, and importvpn1.ovpn. - If your provider has their own client, then follow your provider’s instructions to configure VPN1 on your host PC.
You can test connecting to VPN1 now if you want to. Toggle the VPN connection to the ON position. After testing the connection from your browser, disconnect VPN1 (unless you want to leave it running for all the remaining steps).
2. Download ISO Files
2.1. Download pfSense
Download the latest pfSense compressed ISO from the pfSense download page.
- The Version will be prefilled with the latest version (currently
2.4.5-p1) - For Architecture, select AMD64 (64-bit)
- The Installer you want is a CD image (ISO) installer
- Choose a Mirror from New York, Austin TX, Frankfurt, or Singapore
Click the DOWNLOAD button. By default, the file is saved in your Downloads directory. It has a name that looks like
pfSense-CE-2.4.5-RELEASE-p1-amd64.iso.gz. We will use this name in our examples, although it may have changed by the time you read this tutorial.
2.2. Verify pfSense
The expected SHA256 checksum is displayed underneath the DOWNLOAD button on the pfSense download page.
Display the actual SHA256 checksum of your downloaded file by issuing the commands:
cd ~/Downloads
sha256sum pfSense-CE-2.4.5-RELEASE-p1-amd64.iso.gz
The expected and actual values should be identical.
2.3. Extract pfSense ISO
Extract the ISO from the compressed archive:
gunzip pfSense-CE-2.4.5-RELEASE-p1-amd64.iso.gz
This replaces the compressed file with the extracted ISO file. In our example, it would be named pfSense-CE-2.4.5-RELEASE-p1-amd64.iso.
2.4. Download Debian Live CD
Open Firefox and visit the Debian Live CD page.
Download your chosen version of the 64-bit Debian Live CD. We will choose the XFCE version of Debian, since it is lighter on resource usage than GNOME.
At the time of writing, the ISO file is named debian-live-10.5.0-amd64-xfce.iso. We will use this name in our sample commands. It may have changed by
the time you read this tutorial. The current live CD ISO file is a 2.2 GB download.
2.5. Get Debian Signing Key
The fingerprint of the Debian CD signing key is given on the Debian website as DF9B 9C49 EAA9
2984 3258 9D76 DA87 E80D 6294 BE9B. Download the public key from the Debian keyserver:
gpg --keyserver keyring.debian.org --recv-keys DF9B9C49EAA9298432589D76DA87E80D6294BE9B
The Debian CD signing key is imported.
2.6. Verify Debian Live CD
From the Debian Live CD page, download the checksum file
SHA512SUMS and its signature SHA512SUMS.sign. You will probably have to right-click and select Save Link As to download
these two files.
Verify the SHA512 checksums file:
cd ~/Downloads
gpg --verify SHA512SUMS.sign SHA512SUMS
The results should include a message, Good signature. Do not worry if there is an additional message, There is no indication that the signature
belongs to the owner.
Display the expected SHA512 checksum by issuing the command:
cat SHA512SUMS | grep debian-live-10.5.0-amd64-xfce.iso
Display the actual SHA512 checksum of the Debian Live CD ISO file:
sha512sum debian-live-10.5.0-amd64-xfce.iso
The expected and actual values should be identical.
3. Set Up Virtualization
3.1. Prepare Firewall
Livbirt uses iptables to support virtualization. There have been reports of conflicts arising if you use nftables as your firewall. Until this issue is resolved, it’s best to use iptables for your machine’s basic firewall. Therefore if you are using nftables, stop and disable it, uninstall it, then reconstruct your basic firewall with iptables.
3.2. Install KVM
Install the Virtual Machine Manager and all its dependencies, which include qemu-kvm and libvirt:
sudo apt update && sudo apt upgrade -y
sudo apt install virt-manager
Add yourself to the group that manages virtual machines:
sudo usermod -aG libvirt myuserid
Replace myuserid in the above by your actual user id on the host.
In theory, you could just log off and log on again at this point. In practice, it is often better to reboot after installing virtualization:
sudo reboot
3.3. Start Default Network
From Activities, search for virt. Start Virtual Machine Manager.
Right-click on QEMU/KVM. Select Details. Select the Virtual Networks tab.
The network named default should be active and set to autostart on boot. If not, open a terminal and issue the commands:
sudo virsh net-autostart default
sudo virsh net-start default
3.4. Create Internal Network
Still on the Virtual Networks tab, click the plus sign (+) and add a new internal network. In the wizard:
- For the network name, put
intnet, and click Forward - Uncheck all the IPv4 options, and click Forward
- Uncheck all the IPv6 options, and click Forward
- Select Isolated virtual network, blank out the DNS domain name at the bottom, and click Finish
The new network intnet should be active and set to autostart on boot.
Close the QEMU/KVM connection details window.

4. Set Up Gateway
4.1. Create Gateway VM
Create a new virtual machine in Virtual Machine Manager (File > New Virtual Machine).
- Select Local install media, and click Forward.
- Browse to
pfSense-CE-2.4.5-RELEASE-p1-amd64.iso. Uncheck automatic operating system detection. TypeFreeBSD(since pfSense is based on FreeBSD), and select the latest version. Click Forward. - Put memory
1024, CPUs1, and click Forward. - Put disk image
4.0GiB, and click Forward. - Name the machine
Gateway.
Do not click Finish just yet! We are going to add a second network interface card.
- Check the box Customize configuration before install.
- Now that you’ve checked that box, you can click Finish.
- Select the existing NIC.
- Set the device model to
e1000. - Click Apply.
- Click Add Hardware.
- Select the Network page.
- Select network source
Virtual network intnet. - Now you can click Finish.
Your virtual machine is ready to go with two virtual network interface cards, one for the default NAT network, and one for the isolated internal
intnet network.

4.2. Install pfSense on Gateway VM
Now you can click Begin Installation to start the gateway VM. If necessary, allow the Virtual Machine Manager to inhibit your normal keyboard shortcuts on the host.
In the console window, select option 1 for Boot Multi User, or just leave it a few seconds until it does this by default.
- On the Copyright and distribution notice, select Accept and press Enter
- On the Welcome screen, select I for install pfSense, then OK and press Enter
- On the Keymap Selection screen, select your keyboard, then Select and press Enter
- For Partitioning, select A for Auto (UFS) Guided Disk Setup, then OK and press Enter
- Wait while the Archive Extraction proceeds
- For additional Manual Configuration, select No and press Enter
- On the Complete screen, select Reboot and press Enter
4.3. Change Internal Network IP Addresses
The gateway machine reboots. You will notice that when pfSense starts, it allocates 192.168.1.1/24 for the internal network (the LAN, from pfSense’s
point of view). This will work, but it could create confusion, since consumer routers often use this range for home networks.
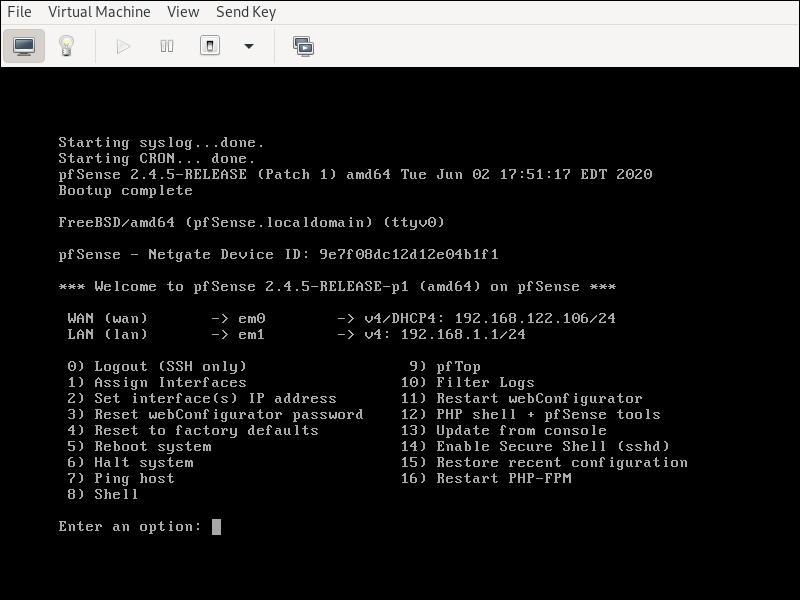
We’ll change the internal network to use the subnet 192.168.100.1/24.
Enter option 2 to set the interface IP address.
- When asked which of the available interfaces you want to configure, enter
2for the LAN - For the new IP address, put
192.168.100.1 - For the subnet bit count, put
24 - There is no upstream gateway for the LAN, so leave it blank
- There is no LAN IPv6 address, so leave it blank
- For DHCP server, put
yfor yes - For start address for the client range, put
192.168.100.64 - For start address for the client range, put
192.168.100.127 - When asked if you want the webConfigurator to revert to HTTP, put
nfor no - When the new webConfigurator address is displayed, check that it looks right, then press Enter
The pfSense main menu is redisplayed with your new LAN IP address of 192.168.100.1.
Leave the pfSense virtual machine running. You can minimize its window if you like.
5. Set Up Workstation
Create a second virtual machine in Virtual Machine Manager (File > New Virtual Machine).
- Select Local install media, and click Forward.
- Browse to
debian-live-10.5.0-amd64-xfce.iso. Uncheck automatic operating system detection. TypeDebian 10and select Debian 10. Click Forward. - Since this will be your workstation, you can give it as much resources as you like. For example, you might put memory
2048and CPUs2. Click Forward. - Do not give it a disk! The idea is that this should be a live CD workstation. After the host computer is turned off, no traces will remain of its activity. Therefore uncheck Enable storage for this virtual machine. Click Forward.
- Name the machine
Workstation. - Most importantly, expand Network selection, and select
Virtual network intnet. This machine must not be attached to the NAT network!
Click Finish. Select Debian GNU/Linux Live.
When the XFCE desktop appears, go to Applications > Settings > Display and make the resolution bigger if you like. You may need to resize the window for the workstation.
6. Run pfSense Set Up Wizard
6.1. First Time Login
We’re going to log into the pfSense WebGUI from the workstation VM.
In the workstation VM, open Firefox (Applications > Web Browser).
- Navigate to
https://192.168.100.1. This was the LAN address we chose for the pfSense gateway VM. - You will see a warning about a potential security risk. This is because the certificate is self-signed.
- Click Advanced.
- Scroll down. Click Accept the Risk and Continue.
Sign in as user admin with password pfsense. We’ll change the default password in a moment.
6.2. Run Set Up Wizard
The first-time wizard is displayed immediately.
- On the Welcome screen, click Next.
- On the Global Support screen, click Next.
- On the General Information screen, put your choices of DNS servers for the gateway. In our example, we are going to use primary
9.9.9.9and secondary149.112.112.112here. Uncheck the box that allows these to be overridden from the WAN. Click Next. - On the Time Server screen, click Next.
- On the WAN screen, click Next.
- On the LAN screen, you will see your choice of
192.168.100.1. Click Next. - On the Password screen, choose your new administrator password, reenter it, and click Next.
- On the Reload screen, click Reload.
Wait for the reload to complete.
Now, back in the gateway console, choose option 5 and confirm with y for yes to reboot pfSense.
7. Add VPN Client to pfSense
7.1. Get VPN Details
At this point, the workstation has direct access to the Internet via the gateway.
If you want extra privacy, you could turn on VPN1 on the host for a moment. Download the configuration file from your VPN2 provider to your workstation VM. You can then turn off VPN1 on the host.
For pfSense, you are going to have to extract details from your VPN2 configuration file. You can use the text editor (Applications > Accessories > Mousepad) for this. You want to be able to identify:
- The Certificate Authority (CA) certificate
- The client certificate
- The client key
- All the other configuration parameters
Not all VPN providers will give you all the certificates. Procedures vary tremendously from VPN provider to VPN provider. Some give you separate files; some give you an all-in-one configuration file.
7.2. Add Certificates
In most cases, whether all-in-one or separate files, you will get a CA certificate, a client certificate, and a client key. In the pfSense WebGUI running on your workstation, log in using your new password rather than the default. Go to System > Cert. Manager.
On the CAs tab, add a new CA certificate.
- The name can be
ca2or whatever you like. - Method is Import an existing Certificate Authority.
- Copy and paste the contents of your provider’s CA certificate to the box for Certificate data.
- Click Save.
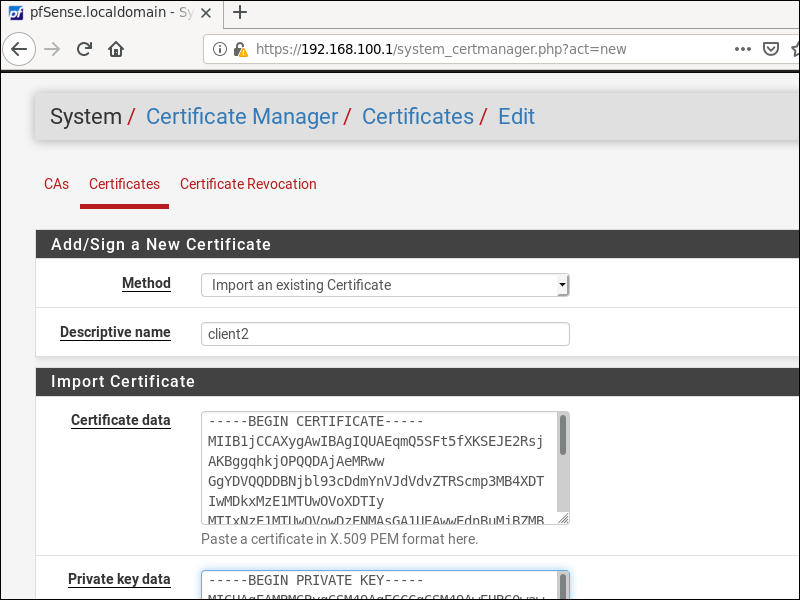
On the Certificates tab, add a new certificate.
- Method is Import an existing Certificate.
- Name can be
client2or whatever you like. - Copy and paste the contents of client certificate to the box for Certificate data.
- Copy and paste the contents of your client key to the box for Private key data.
- Click Save.
7.3. Add OpenVPN Client
In the pfSense WebGUI running on your workstation, go to VPN > OpenVPN. Go to the Clients tab. Click the button to a new VPN client.
The details are highly dependent on what your VPN2 provider gave you in the vpn2.ovpn file. Again, this will vary from VPN provider to VPN provider.
What follows is very much just an example.
- You may be able to leave many fields at their default values.
- Server host or address is the IP address of the VPN2 server.
- You will get a username and password from most VPN providers.
- Use a TLS key was checked (in our example).
- Automatically generate a TLS key was unchecked because we are going to enter it from the configuration file.
- TLS key for us was the OpenVPN static key between the open and closing
tls-crypttags in the.ovpnfile. - TLS Key Usage Mode was TLS Encryption and Authentication.
- Client certificate was
client2. - Encryption algorithm in our example was AES-128-GCM.
- Compression in our example was Omit preference (use OpenVPN default).
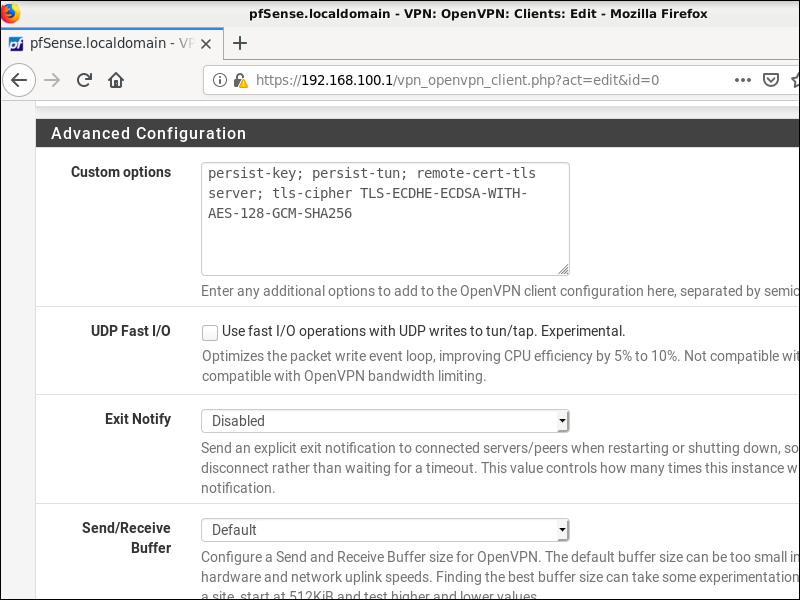
- Custom options (separated by semicolons) were
persist-key; persist-tun; remote-cert-tls server; tls-cipher
                TLS-ECDHE-ECDSA-WITH-AES-128-GCM-SHA256
Just to emphasize the point, you will have to change all the above according to the configuration of your VPN2 provider’s server. The values given were just examples.
When you have entered all the details for your VPN2, click Save.
7.4. Check VPN Status
In the pfSense WebGUI running on your workstation, go to Status > OpenVPN. The Status should be
up.
Go to Status > System Logs > OpenVPN. The messages should include Initialization Sequence
Completed.
7.5. Amend DHCP Server DNS Servers
These are the DNS servers that will be pushed to the workstation. Look again at Status > System Logs >
OpenVPN. See if there is a line PUSH: Received control message. If so, look for dhcp-option DNS followed by IP
addresses.
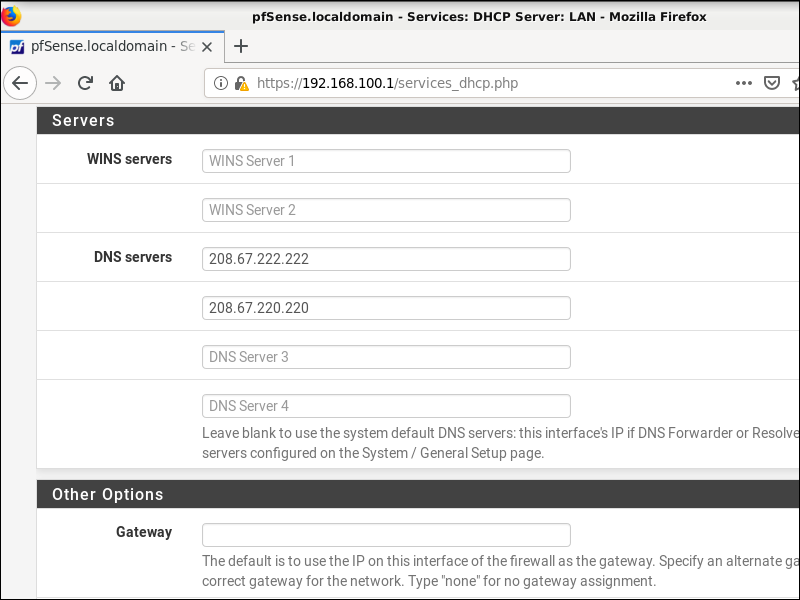
- If you received pushed DNS servers, go to Services > DHCP Server and specify those IP addresses as your DNS servers.
- If you did not receive pushed DNS servers, go to Services > DHCP Server and specify some other DNS servers from
the sources listed in section 1.1 above. The idea is to segment your DNS usage over different servers whenever possible. We are using
208.67.222.222and208.67.220.220in this example.
Click Save.
7.6. Create Interface
At this point, pfSense is not routing anything through OpenVPN, and your workstation VM has no Internet connectivity. That’s normal. Don’t worry.
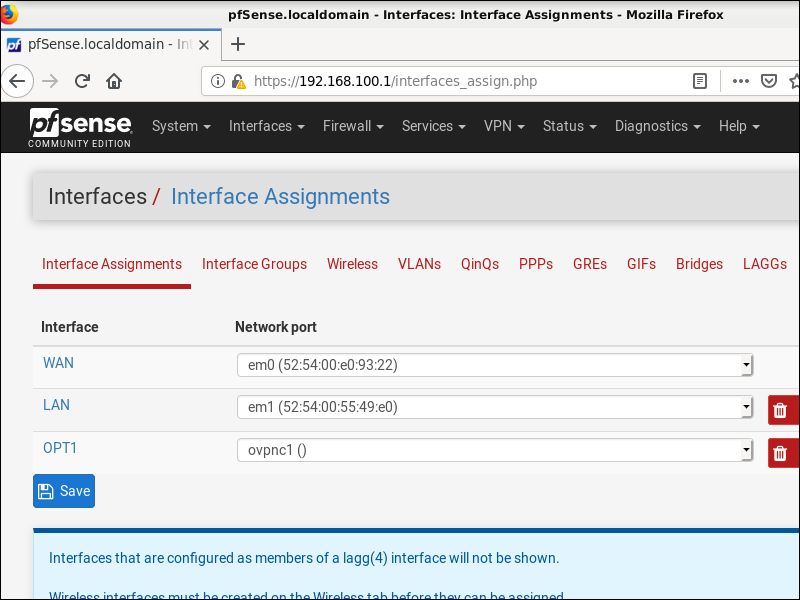
Go to Interfaces > Assignments. Click the plus sign + to create OPT1 interface
ovpnc1 (OpenVPN client interface 1).
- Click
OPT1to edit its details. - Check Enable interface.
- Click Save.
- Click Apply Changes.
7.7. Configure NAT
Now we configure Network Address Translation (NAT) for the new interface OPT1. Go to Firewall > NAT.
- Select the Outbound tab.
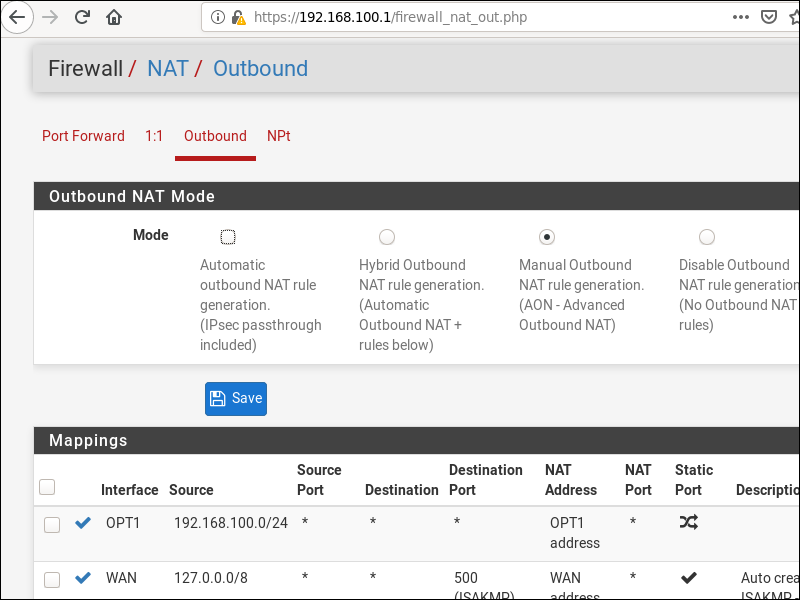
- Select Manual Outbound NAT rule generation..
- Click Save.
- Click Apply Changes.
After the changes are applied, there will be either four or six rules: two for localhost to WAN IPv4, possibly two for localhost to WAN IPv6, and two for LAN to WAN.
Add a new rule for interface OPT1, with source equal to your subnet 192.168.100.1/24. Click Save.
Hit the Apply Changes button.
7.8. Edit LAN Rules
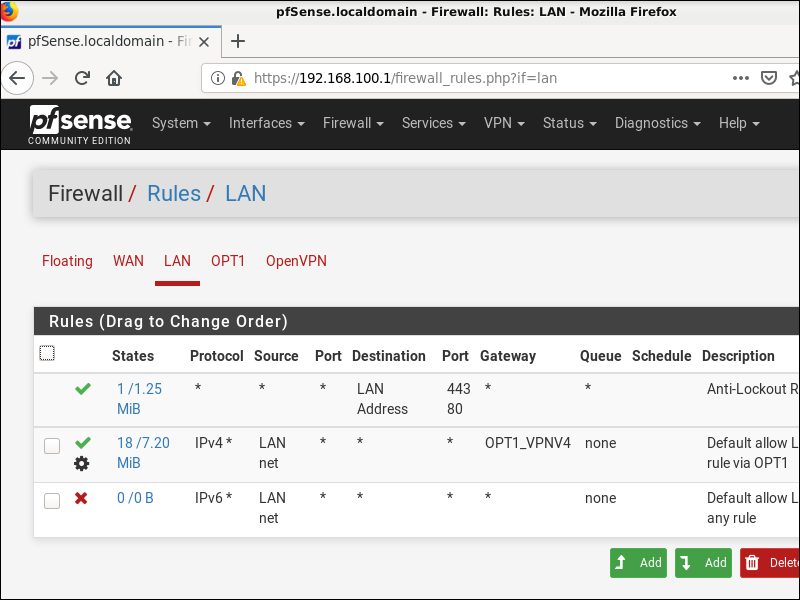
We will change the rules to allow output from the LAN on our OPT1 interface but to block any IPv6 traffic. Navigate to Firewall >
Rules. Go to the LAN tab.
Edit the existing rule Default allow LAN to any rule.
- Change the Description to
Allow LAN to any rule via OPT1. - Display Advanced Options.
- Scroll down Gateway and select
OPT1_VPNV4. - Click Save.
Also edit the existing rule Default allow LAN IPv6 to any rule.
- Change the Action from Pass to Block.
- Click Save.
Click Apply Changes.
7.9. Complete Set Up
- Shut down the workstation from the XFCE desktop.
- Back in the pfSense VM console window, halt system by entering
6and thenyto confirm.
8. End-to-End Test
- On the host PC, connect VPN1. Allow a few seconds for VPN1 to connect. From Firefox on the host, visit IPchicken.com. You should see the VPN1 server IP address.
- Power on the gateway VM. After the pfSense bootup, there should be three interfaces (
WAN,LAN, andOPT1), and you should have an IP address for theOPT1interface. - Start the workstation from the live CD.
- In Firefox on the workstation, test your connection all the way to a website. In particular, visit IPchicken.com or a similar site. You should see the VPN2 server IP address. You are therefore reaching VPN2 through your VPN1 tunnel.
9. Get Help and Report Issues
Here are some avenues for support:
Updated 2020-09